
HisencnGrill Replacement Parts for Charbroil Commercial 4 Burner 463241113, 463449914, 463250811, 463251012, 463241413, Gas Grills, Pipe Burner Tube, Heat Plate Tent Shield and Crossover Tube
Description
🔥 Ignite Your Grill Game with Our Premium Parts! 🔥
- BUILT TO LAST - Durable stainless steel ensures longevity and consistent performance.
- REVITALIZE YOUR GRILL - Transform your Charbroil experience with premium stainless steel components.
- PERFECT FIT GUARANTEED - Designed specifically for Charbroil models 463241113 and 463449914.
- CUSTOMER CENTRIC SUPPORT - We're here for you—reach out anytime for assistance!
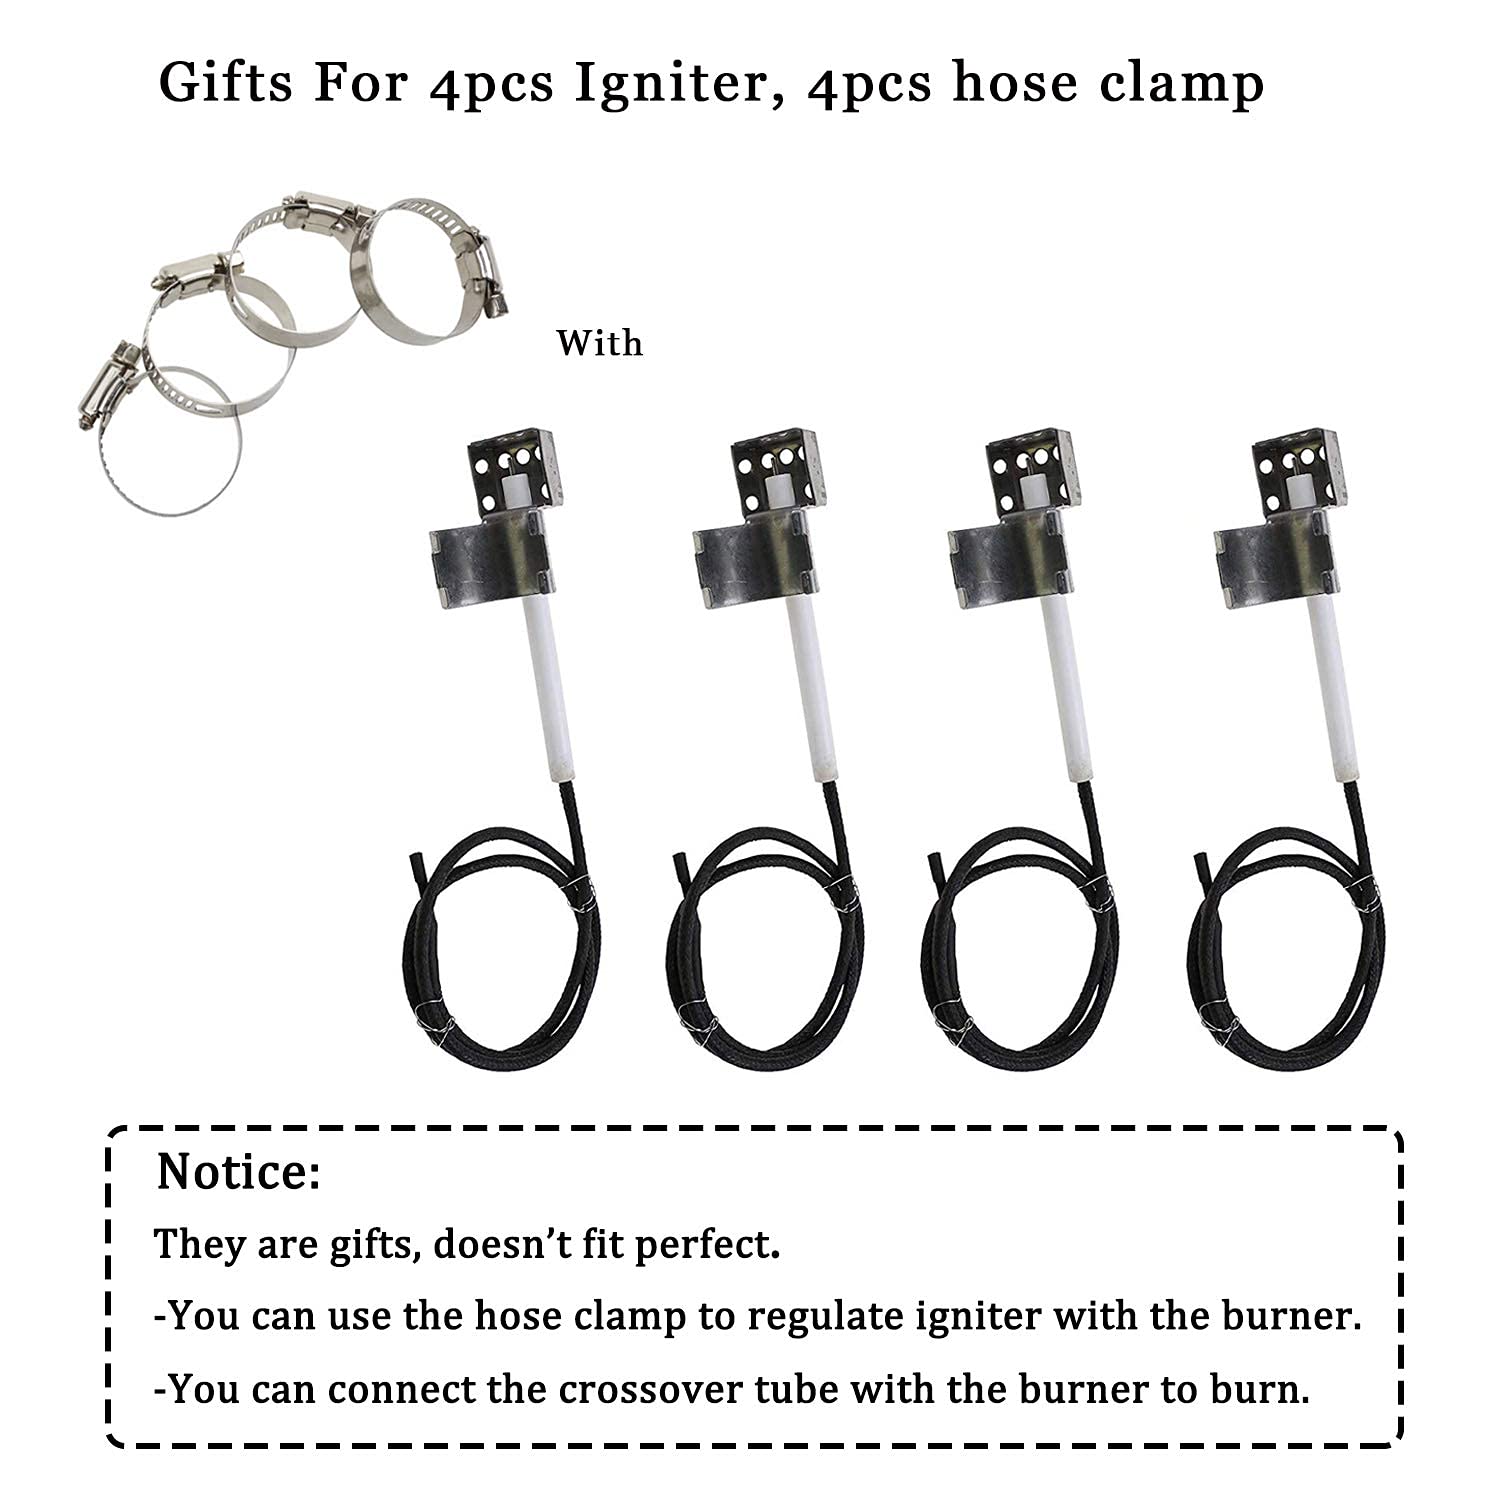
- COMPREHENSIVE REPAIR SOLUTION - Includes everything you need: 4 burner tubes, heat plates, and more.
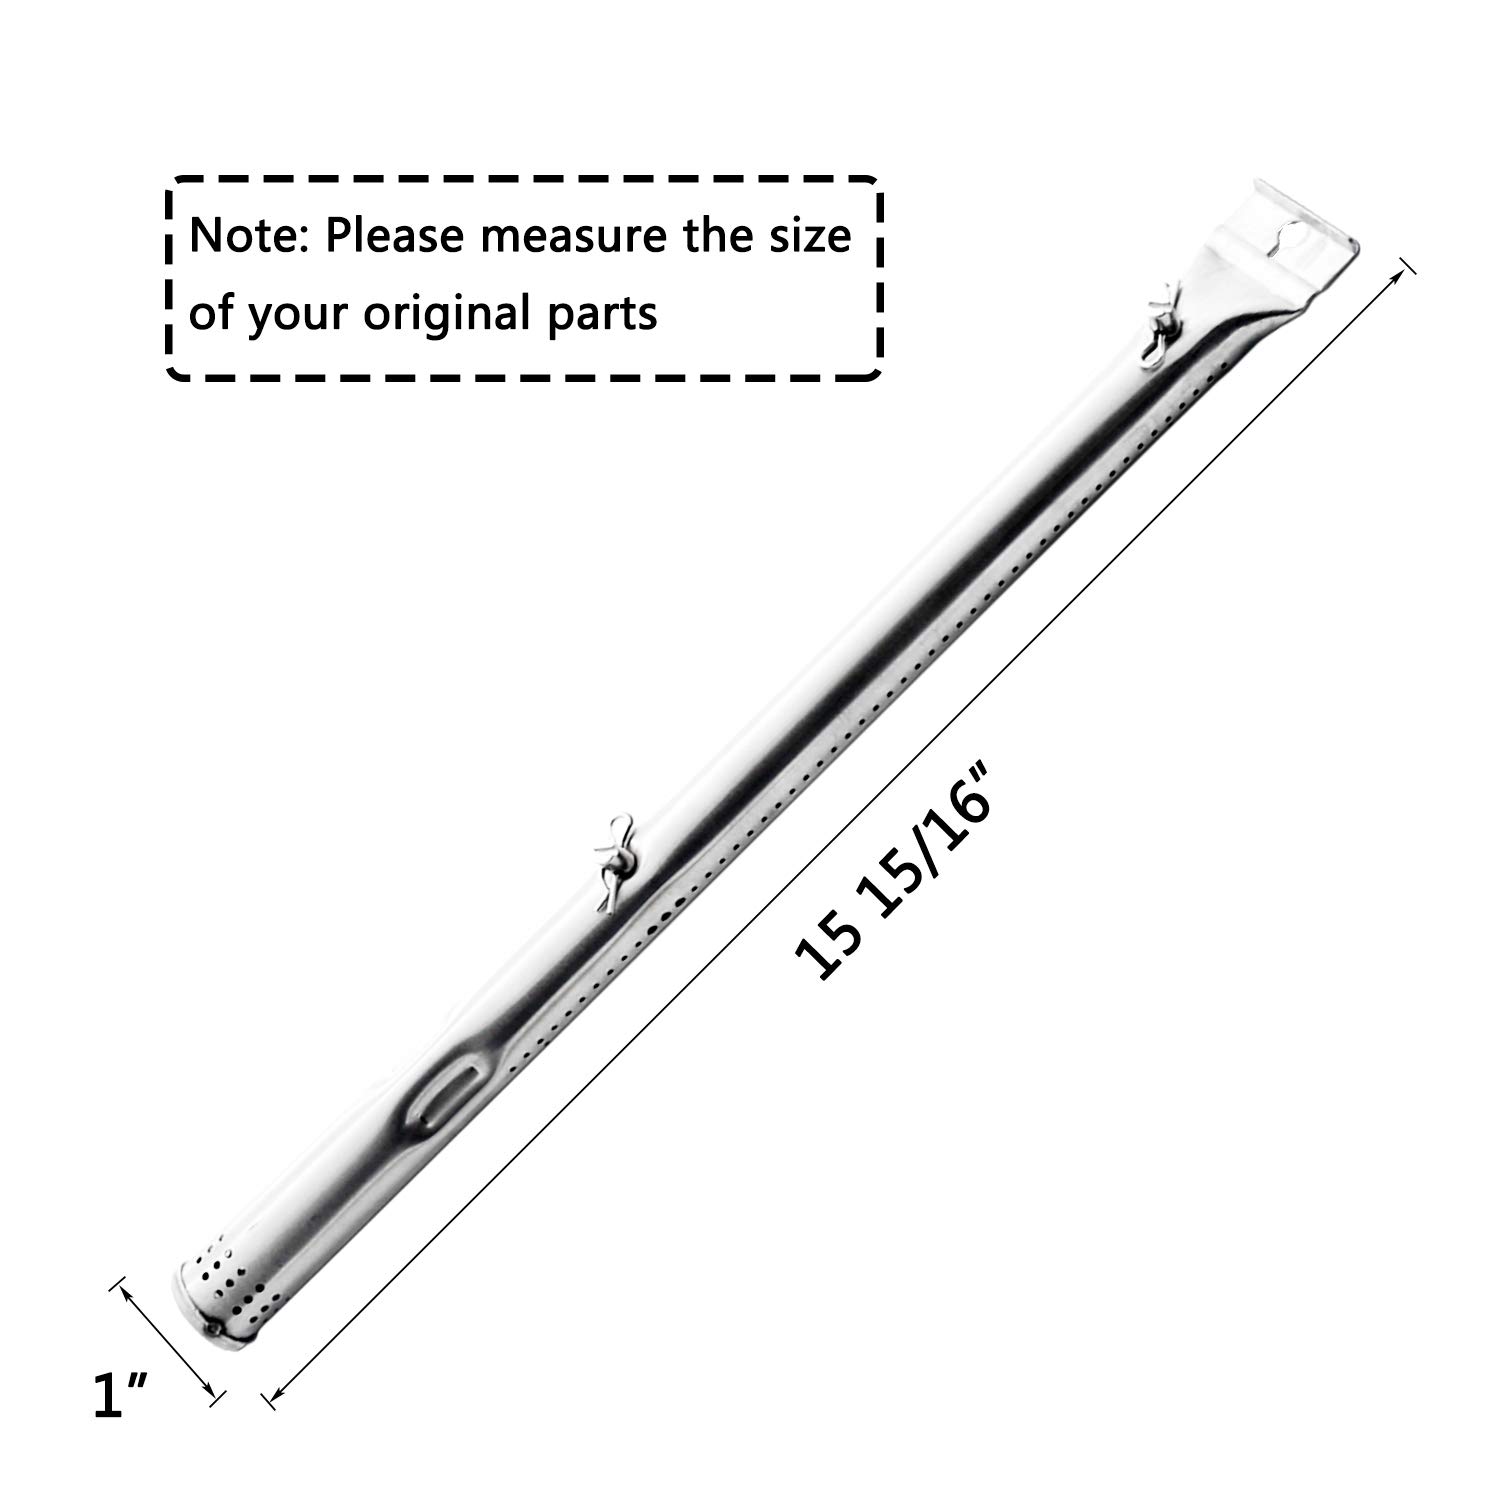
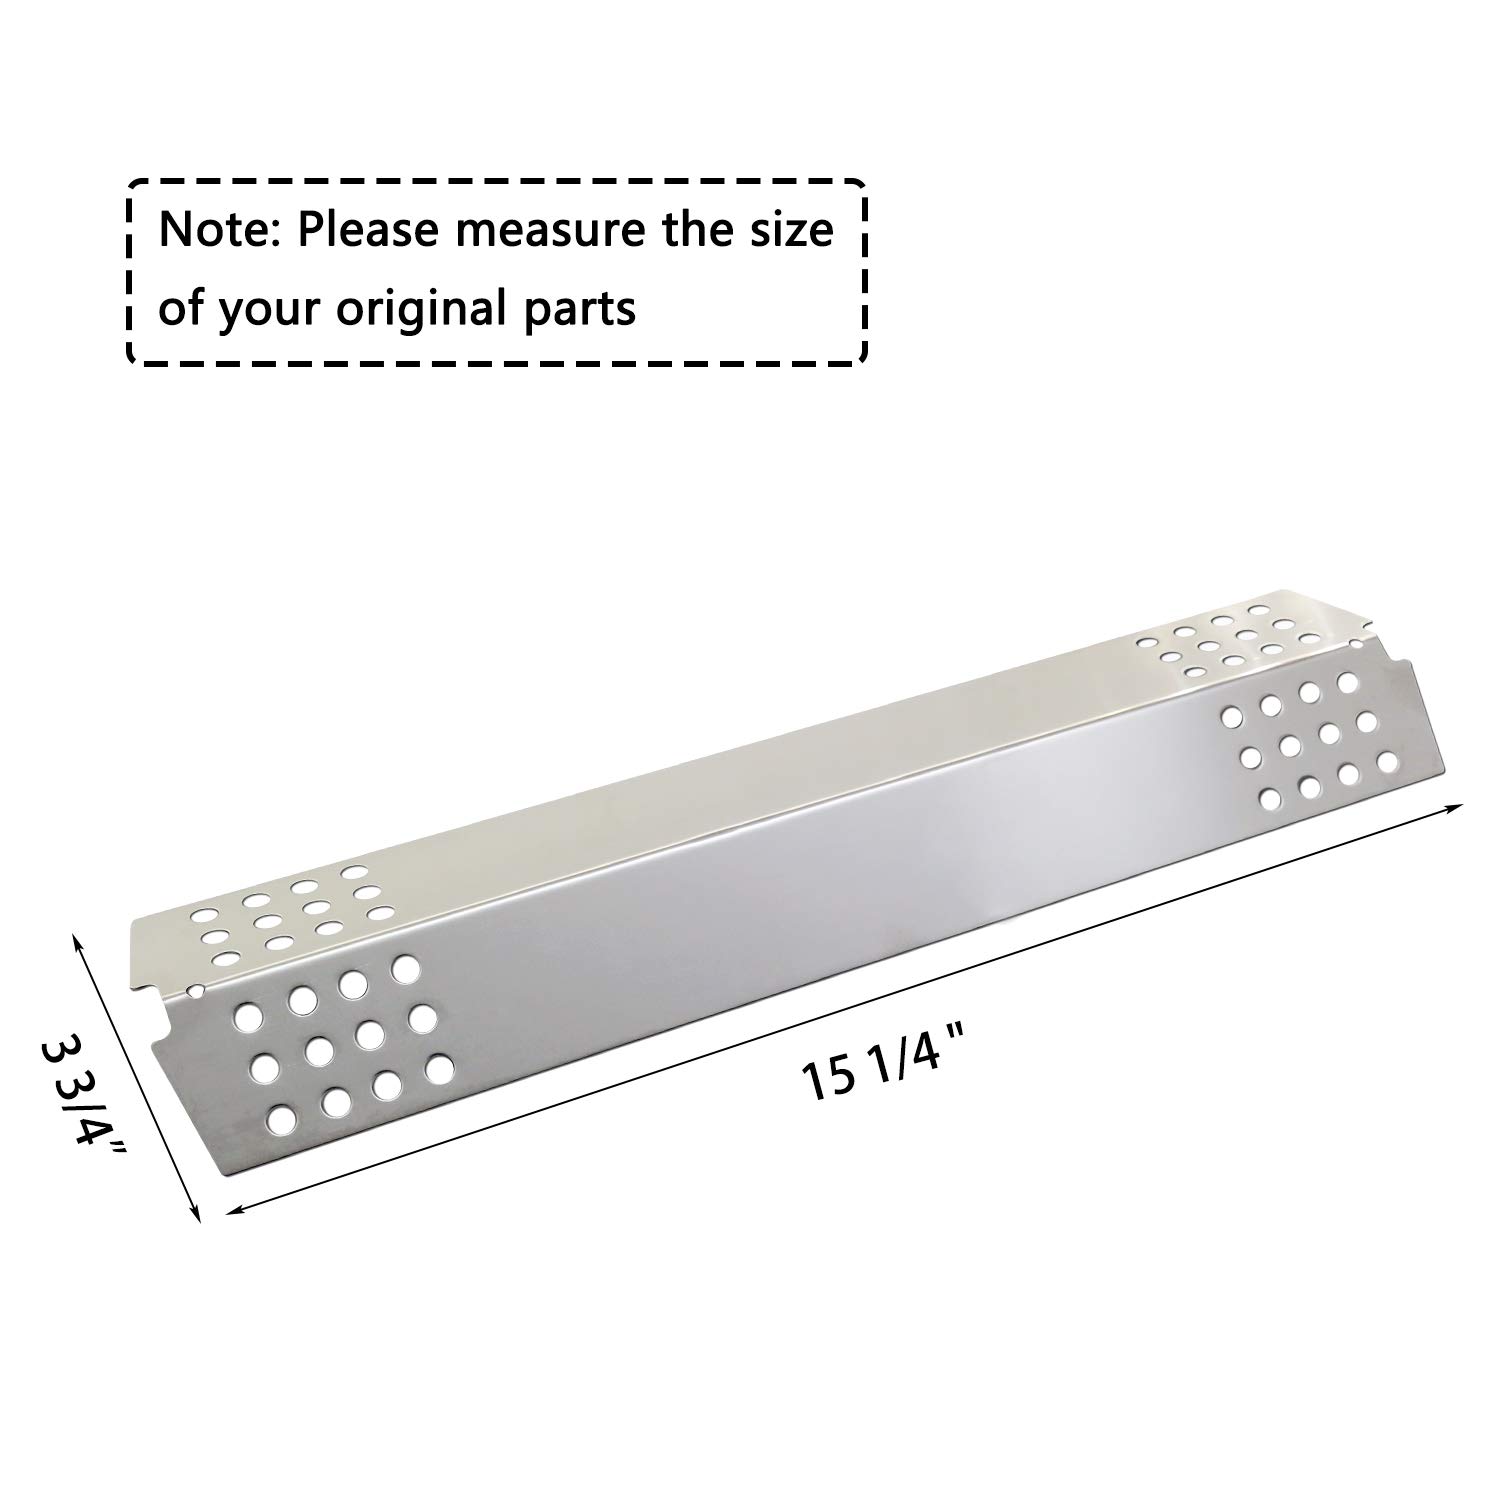
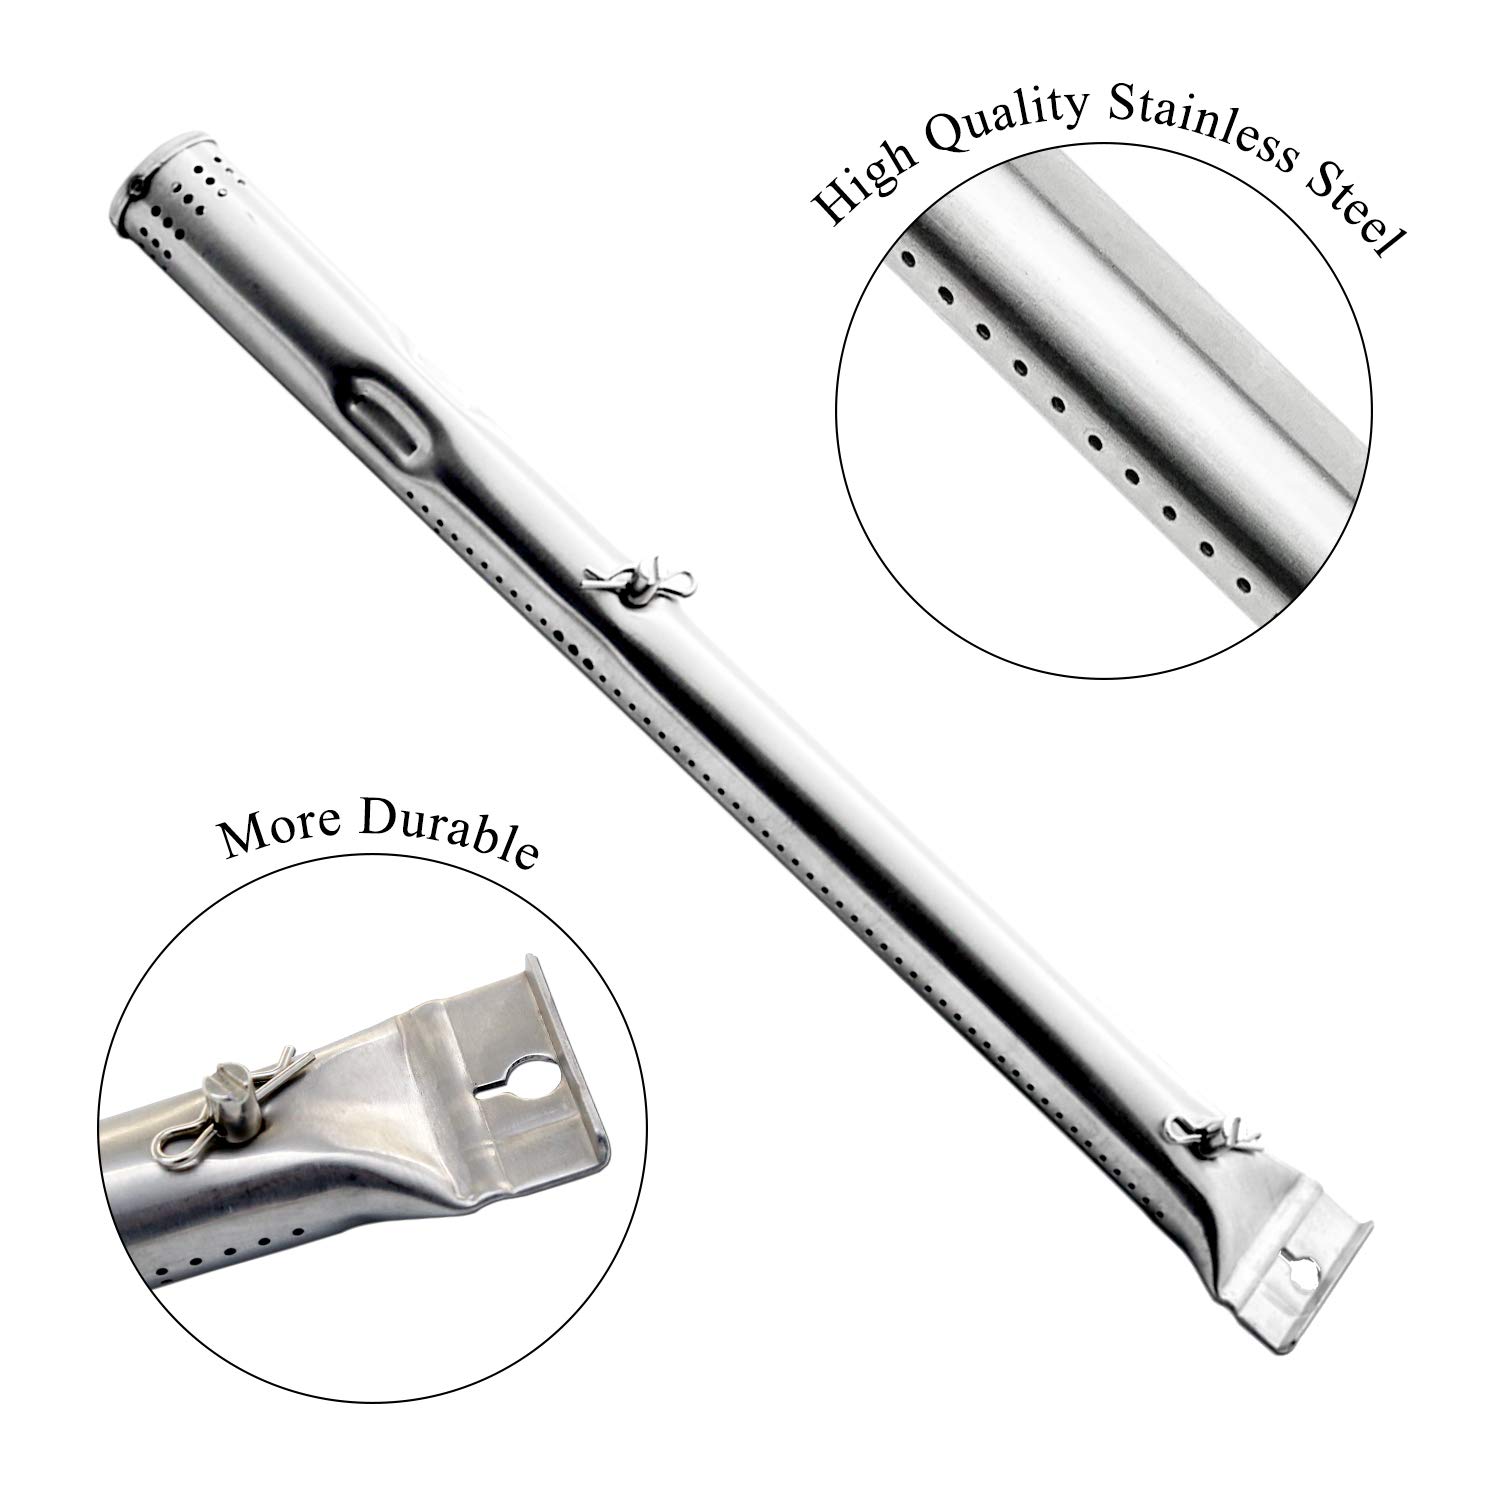
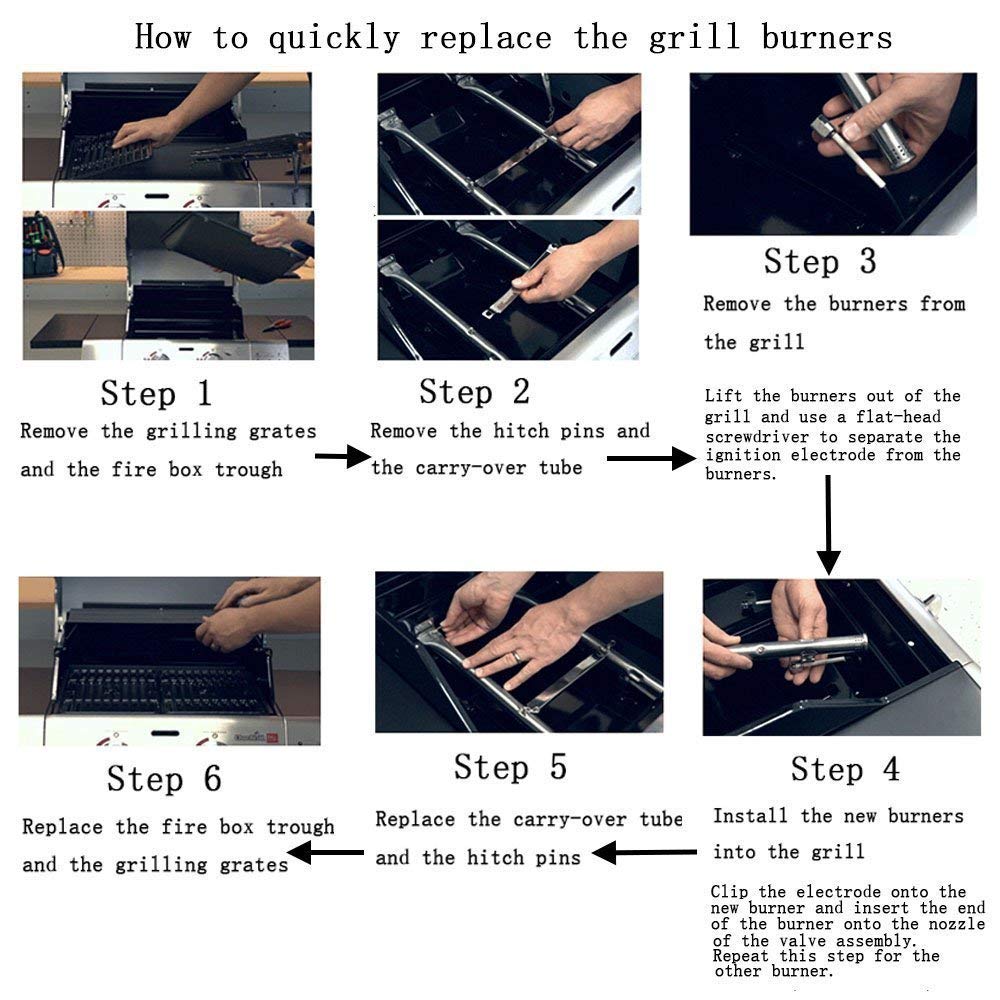
The Hisencn Replacement Parts Kit is a comprehensive solution for restoring your Charbroil 4 Burner gas grill. This kit includes high-quality stainless steel burner tubes, heat plates, and crossover tubes, ensuring a perfect fit for models 463241113 and 463449914. With precise dimensions and a complete set of components, this kit is designed for durability and optimal performance, making it an essential upgrade for any grilling enthusiast.
Reviews
R**R
Easy install but faulty igniter design
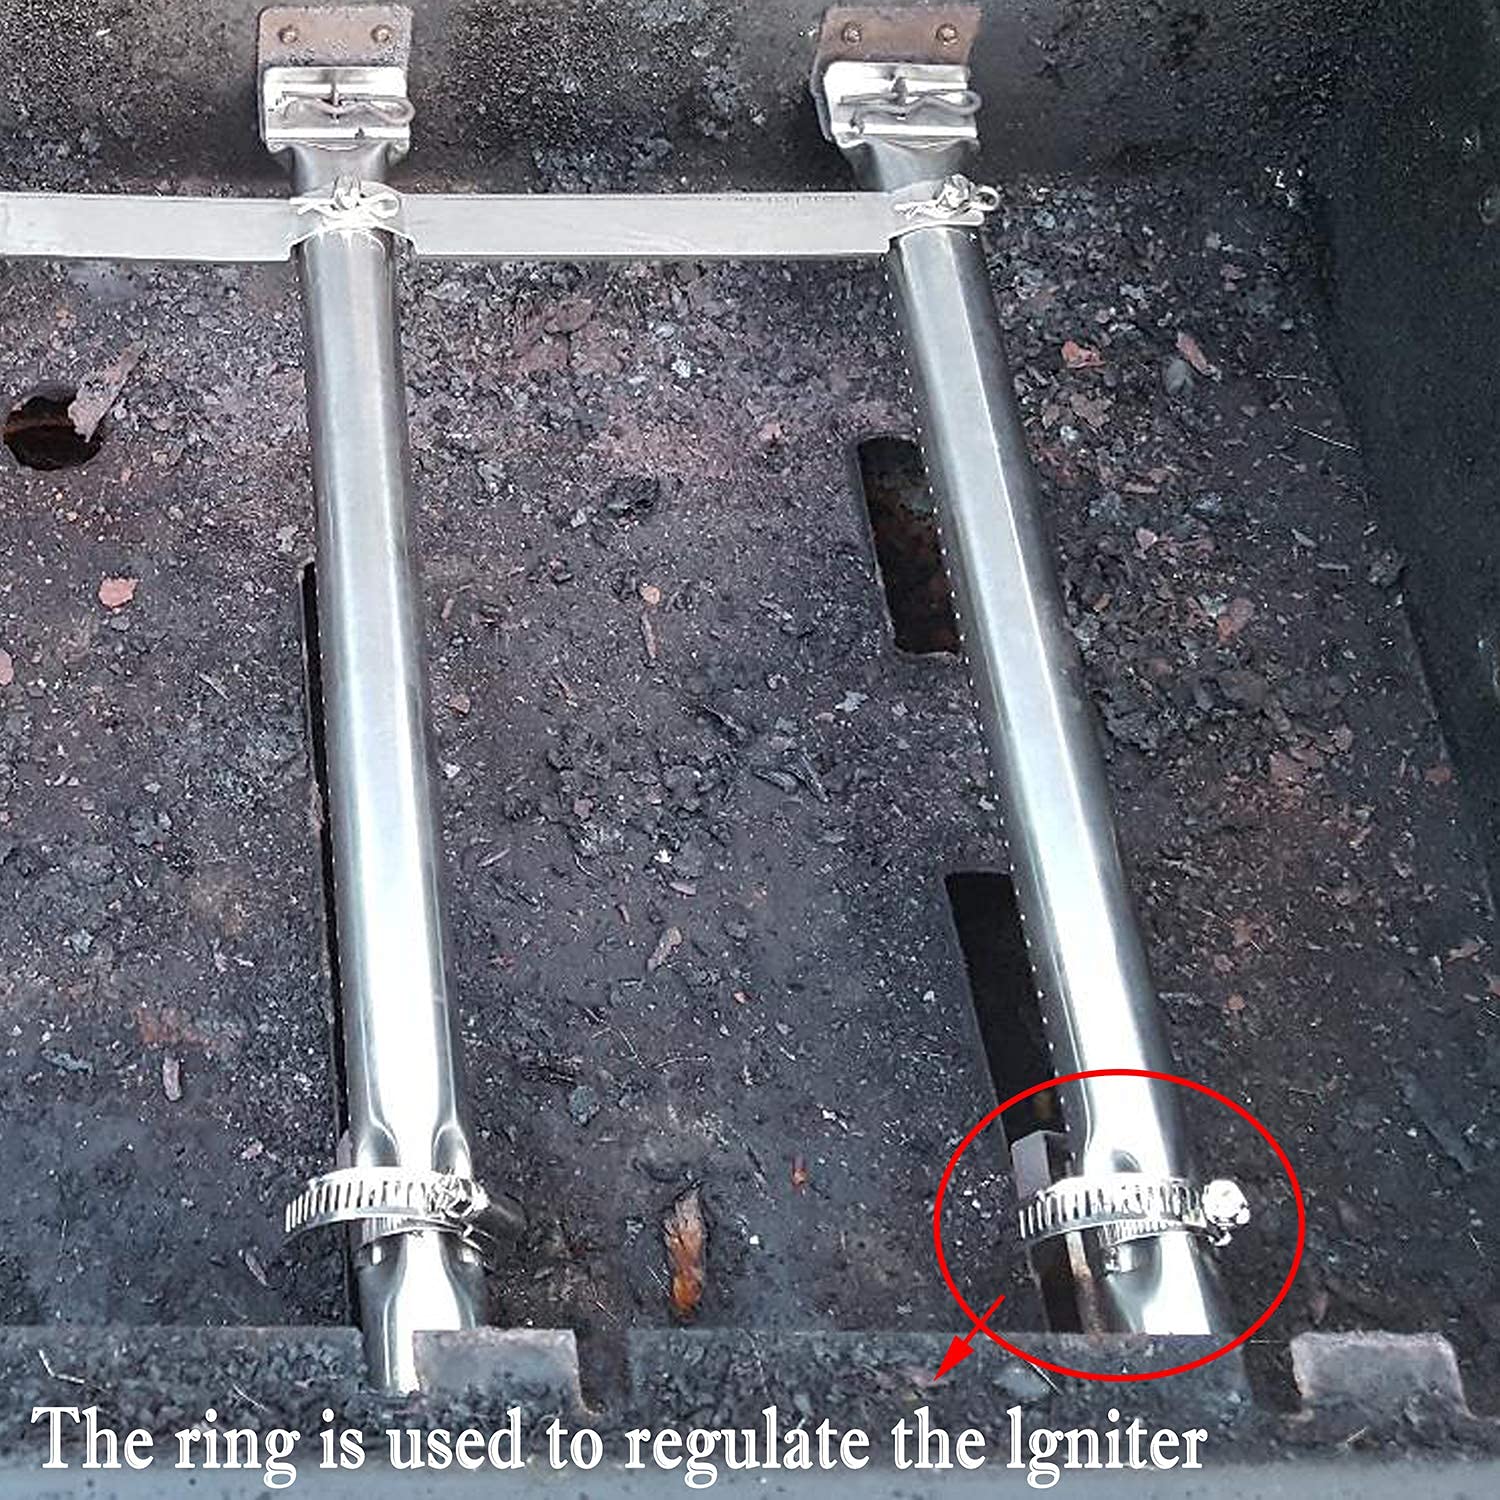
This product was much needed for my trusty Charbroil Grill. Reviewing prior post I now completely understand the issue many are having. The clamps provided are only needed because their design doesn’t fit their own product. The clamps are a fix for the igniter that’s supposed to clamp on to the burner. The issue is the clasp on the igniter is too small and I feel this was a fix so that they could still sell a faulty product.That being said, it does work however the igniters are further from the burners than they should be and they also do not sit flush to the burner. They do however still function so that being said, will anyone really notice? Probably not. Will their clamps last the time time of the replacement parts? Probably. It does the trick but I’m sad to see such a simply piece not properly fit.
J**S
Be Prepared to Modify
Very complete kit. Strong value for the money. Parts material appear to be OEM quality but the engineering is not the best.Recommend carefully removing the old parts first before ordering this kit. Very possible to break firebox pins and have to Macgyver things or opt for new grill.We have the Char Broil commercial model 463449914. As some reviewers previously stated, the main burner mounting hole is a cross shaped opening. Needed a 5/16" drill bit, drilled out the cross holes and was able to install the 4 main burner tubes. (To accommodate the firebox rear [hinge side] pins)The main burner pins where the changeover tubes get secured are too short. The 2 center main burners have the changeover tubes overlap, it was impossible to get cotter pin in to secure changeovers. Need a few cookouts to have grease and char dust secure things.Main burner tube lengths, changeover tube lengths & burner tent lengths are all good for this model.
M**S
Not an OEM replacement part
I have Model # 463449914 (4 burners, 2 side shelves), and reading other reviews; it should've fit like an OEM part.But it didn't. Like mentioned in other reviews, the hole in the end of the burner tube is too small; and needs to be drilled out with a 5/16" drill bit. Keep in mind, this is stainless steel; so you will need a sharp (new) drill bit and fully charged cordless drill. The replacement burner tube is also too long (for my grill). It was impossible to insert the tube into the existing gas jet, and land the flat end on the stud. I had to cut about 3/16" off the end, right to the top of the oval (same oval I had to drill out). Again, this is Stainless Steel; so fortunately for me I have a band saw. I did not receive any hose clamps, but did not need them. The igniters fit like a glove on the burner tubes. After the installation was complete, there is a loud gas noise when igniting each burner. It sounds like the gas is on full force and out of control. I have to play with the burner control knobs to get the loud "Hissing" noise to stop.This should've been a 1/2 hour install, instead it was a couple of hours.Definitely measure the length of your burners, and compare to the ones included in this kit.If you are handy, and willing to make some modifications; this is a good value.
M**M
Here are directions for installation
No directions. No directions online, either. See below for directions.I couldn't find any videos, either that were particularly helpful. Overall I spent about an hour surfing videos to see if I could learn what the heck the hose clamps were for, for example, and then another hour trial-and-error installing, so two hours total. I think with directions or a video, this could take 20-30 minutes.Material, especially for the shields for the burners, is relatively thin gage, compared to others I've seen and installed. I also don't think I'm a fan of the perforated/stamped holes at the ends of the burner shields. That will tend to let stuff through, and it will also tend to rot.Price is significantly less that OEM parts, but we won't know until later in the season or next season if they were worth it.So here are very brief install directions for me, in case I buy this kit again and need to install it again:0. The bottom of your grill is disgusting. Sweep it out.1. Get new ignitors in position, set down in the base of the grill for now.2. Test each of the ignitors to make sure they spark. They may not if the housing for the ignitor (the stainless part) is not contacting additional metal (to ensure you have a ground. In the grill, the burner provides the additional mass for the ground). I found that touching two of the ignitor housing bodies together was sufficient to provide enough mass to get a ground for this testing.3. Put the hose clamps on the burner tube, before you put them in the grill. Do not put the hose clamps over any part of the ignitor. The hose clamps are there because the ignitor doesn't quite fit exactly right over the burner tube. The clamp ensures that the ignitor doesn't come detached from the burner, but I repeat, do not put the hose clamp over any part of the ignitor or the ignitor wire at this time.4. Place new burner tubes, cotter pin side up, feeling underneath the grill to make sure the open end of the tube is around the gas nozzle/nipple. A shallow angle of attack is better for catching the nozzle/nipple. You may have to move ignitors to get the tube where it needs to be.5. Slide hose clamps toward you, all the way. Again, they should not be over any part of the ignitor.6. Holding only the burner and the bracket for the ignitor (not the ceramic part, so you don't crack or break or misalign something) snap the ignitor bracket onto burner.7. Test ignition on each burner individually.8. Slide the hose clamp over the ignitor bracket where it attaches to the burner (the hose clamp is going to keep the ignitor from coming off the burner since the fit isn't exact). Tighten the hose clamp.8. Depending on your grill, you may be using the bag of screws and washers to attach the burners to the grill, or the extra cotter pins that are at far end of the burner. For me, the screws and washers were not needed, the cotter pins were.9. Install the separator/connector brackets.
Common Questions
Trustpilot
2 weeks ago
1 month ago
Get the App
